WHAT IS APPLE HOMEKIT?

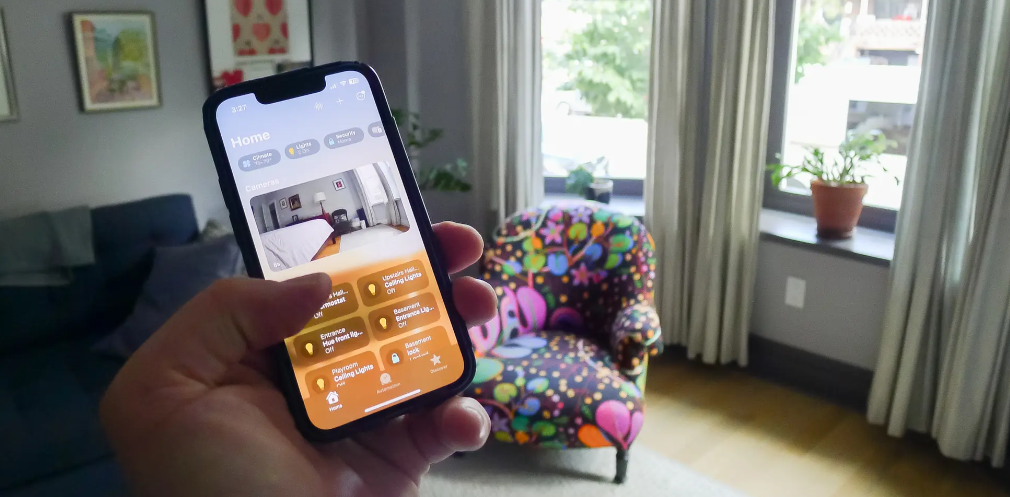
Apple HomeKit is your greatest option if you mostly use your iPhone, surpassing even the top Android flagships, and you’re searching for a smart home system that complements this Apple device integration. Apple’s version of a smart home platform is called HomeKit. Following a difficult beginning, Apple has refined HomeKit into a potent platform that can now compete with Google Home. We assist you with configuring the Home app, setting up your first HomeKit device, and setting up automation. You wouldn’t believe how simple it is to get going.
Explained by HomeKit: More than simply an app
HomeKit is special because it is a framework and the binding agent for your smart home devices rather than a product or piece of software. Consider thermostats, cameras, lighting, and more. And taking care of them? Easy as pie. Utilize the apps on your Mac, iPhone, or iPad, or just say “hey” to Siri.
Imagine preparing the scene for a whole film festival: your smart home can be controlled with a single order to dim the lights, turn on the TV and smart speakers, lower the blinds, and start the popcorn machine. Your home theater is now prepared. (Don’t forget to lock your smart lock on those spooky movie evenings.)
While HomeKit’s gadget compatibility is not as extensive as that of Google Assistant or Amazon Alexa, it is still expanding with a wide range of compatible products, including security cameras, smart plugs, smart lights, and garage door controllers. HomeKit offers a solid foundation for fans of the Apple ecosystem who are just starting out with smart home technology.
Setting up your initial HomeKit gadget
You only need a gadget that supports HomeKit to get going. Purchase a gadget, and you’re done. Here’s how to configure it:
- On your iPhone, launch the Apple Home app.
- Choose Add Accessory by tapping the + button located in the top-right corner of your screen.
- Enter the eight-digit HomeKit setup code on the accessory (or its box or manual) or scan the QR code. As an alternative, if the attachment contains the NFC label, tap it with your iPhone.
- The gadget shows up on your screen once the QR code has been scanned. To establish a connection to your Apple smart home, tap Connect to your house.
- Select a name that is easy for you to remember and store it. This name will be used to provide Siri control over the accessory.
- Set up zones and rooms in HomeKit.
Configure rooms and zones in HomeKit
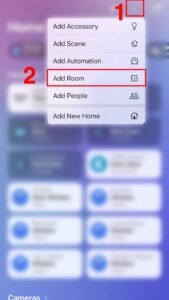
You may group your smart home accessories into rooms using the Home app. Each device will have a designated room. To add rooms, take the following actions:
- Open the Home application.
- In the top-right corner of the screen, tap the plus button.
- Click Add Room.
- Name your room using the keyboard.
- Click “Done.”
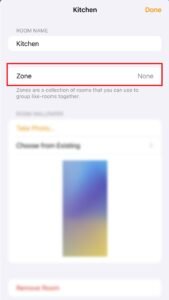
If you want to go even farther, combine rooms together, such as all the rooms upstairs, to create zones. When you wish to simultaneously operate many devices in separate rooms, this comes in useful. To add zones, take the following actions:
- Open the Home application on your iPad or iPhone.
- At the bottom of the screen, tap the Rooms tab.
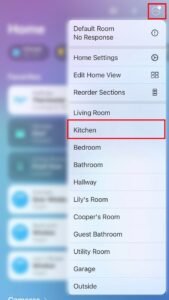
- Choose a room by tapping the More button located in the top-right corner of the screen.
- Choose a suggested name or tap Zone and give it a name.
- Continue adding rooms to the zone.
A home hub’s function in HomeKit
The home hub serves as the central nervous system of your smart home, allowing you to share control with family members or roommates, automate tasks to better suit your lifestyle, and monitor and manage your connected devices from a distance. In addition, adding Matter accessories to the Home app requires first setting up a home hub.
Your gadgets will now finally function as a unit thanks to Apple’s simple setup process for using an iPad, Apple TV, HomePod, or HomePod mini as a hub for managing your house from anywhere. Only one of the devices in your collection that can serve as a HomeKit hub takes the lead; the rest remain in standby mode in case the primary one has an outage. Additionally, the hub serves as a booster for any devices that are just about to fall beyond your Bluetooth range and connects your devices by Bluetooth, Wi-Fi, or Thread.
Setting up and using HomeKit scenes
The most potent component of HomeKit are scenes. It enables you to group actions and trigger them simultaneously. For added security, consider putting the Away Mode Scene on vacation. This scene waters the plants, switches lights on and off at random to mimic someone being home, and notifies you if it detects unexpected motion. To set a scene, follow these steps:
- Click the + symbol in the top-right corner of the Home app after opening it.
- Select “Add Scene.”
- Select Custom.
- Give the scene a memorable name so that Siri can recognize it.
- After choosing the gadgets you wish to use in the scene by tapping Add Accessories, pick Done in the top-right corner.
- To program the additional accessories’ actions for when the scene is activated, press and hold the squares of those accessories.
- When you’ve finished configuring the actions for every accessory, tap Done in the top-right corner.
HomeKit accessories Grouping
One less well-known but useful HomeKit function is grouping devices. It’s perfect for controlling several smart lightbulbs. HomeKit manages them as a single accessory when you group them. Sort your gadgets into groups by doing the following:
- In the top-right corner of your screen, tap More.
- The device’s controls will appear in the room view when you select a room and tap an accessory.
- Select Settings.
- Select the Group along with Additional Accessories.
- After naming your group, select Done.
- To add accessories to your group, tap the desired ones.
- Once your accessories are complete, tap Done to save your group.
Giving people access to your HomeKit
Although HomeKit accessories are associated with the Apple ID of the user who sets them up, sharing the pleasure with others is simple. Decide what guests are allowed and not allowed to do when they are in your house. Here’s how to do it:
- Open the Home app on an iPhone or iPad, then tap the tiny home icon in the top-left corner.
- Select Invite from the People section.
- To invite someone, enter their iCloud email address or use the + symbol to search through your contact list.
- Click “Send Invite.”
- To carry out comparable actions on a Mac, open the People list from the Edit/Edit Home menu.
- A notification of the invitation to accept is sent to the recipient.
- Once added, tap their name to access further settings, such as turning on Remote Access, which enables them to operate your HomeKit devices from any location. They can use voice commands with Siri if they have a home hub. If not, they will use the Home app to manually manage devices. They can also invite others, change the settings, and add or remove accessories.
Using HomeKit for home automation
Go to the automation tab if you have a hub. It enables the linking of gadgets and activities. To carry out:
- Tap the Add button, then select Add Automation.
- Choose An Accessory is Controlled to start an automation when an accessory turns on or off, or choose A Sensor Detects Something for sensor-based triggers.
- Select the accessory that starts the automation.
- Select the action that triggers automation.
- Select scenes and accessories that react to the action.
HomeKit Secure Video and iCloud Integration
Apple introduced HomeKit Secure Video with iOS 13, an API that allows you to locally analyze video from compatible smart home cameras and video doorbells using your iPad, Apple TV, or HomePod. You are the only one with access to your video feeds because they are kept on iCloud and are encrypted end-to-end. It costs $0.99 a month to use a premium iCloud plan to use HomeKit Secure Video. You can connect one HomeKit Secure Video camera to the 50GB $0.99 plan, and up to five cameras to the $2.99 monthly plan. You can connect an infinite number of HomeKit Secure Video cameras with the $9.99/month plan. Under these plans, no stored video footage depletes your iCloud storage.
Apple’s commitment to HomeKit technology security
Since Apple places a high value on security and privacy, any business that wants to offer devices that are compatible with HomeKit must adhere to Apple’s stringent security requirements. Strong security features on HomeKit devices include two-factor authentication, non-reusable encryption keys, and end-to-end encryption.


